

Supplies:
~Mod Podge (I just got mine at Walmart)
~Foam paint brush
~Scissors
~Pictures of your choice (I created a collage on Picasa 3 and printed it)
~Notebook (I got one for $3.00 at Walmart)

How to make it:

1.) Cut out the pictures and lay them out the way you want them to be on your journal. I would suggest positioning them on your journal to make sure they all fit, before you move them off to the side.
2.) Lay your journal out on a flat surface with the covers facing up.
3.) Using the foam brush, spread a thin layer of Mod Podge on the back of each picture. Stick the picture to the journal, making sure the corners are staying down.
Let it sit for about an hour, or until the Mod Podge is dry.
(If you are putting a smaller picture on top like I did, wait until the first layer of pictures is dry before you add anything on top.)
4.) Once everything is completely dry, spread another layer of Mod Podge over the whole thing. It will go on white, but it will dry clear.
5.) Let the journal sit for another hour or so, and it's done!
You can add quotes, initials, stickers, or anything else you want to
personalize it even more.

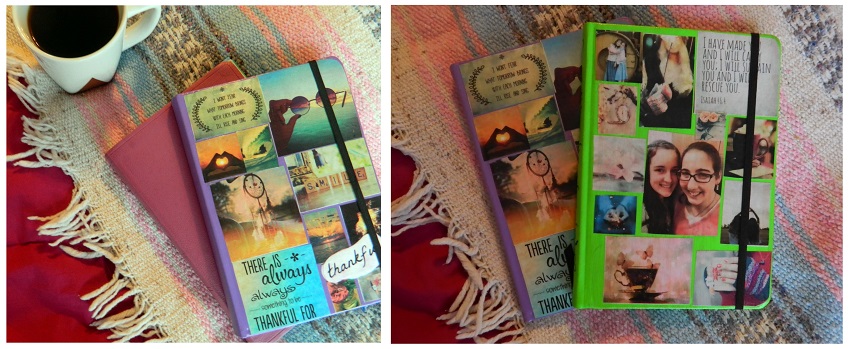
This particular one that I put together in this post is my gratitude journal. I am looking forward to using it for counting 1,000 gifts this coming year! You can change these up to use them for a personal journal, school notebooks, planners, writing down random quotes or lyrics, or anything else you can dream of! I already have several of my own, and I have given some out as gifts as well.
I hope you enjoyed this project tutorial! If you try it out for yourself, let me know how you like it! I'd love to hear about it!
Much love,
~Megan ♥
*original DIY tutorial here
Read my last post here: Reflections and Resolutions
HAPPY NEW YEAR!!! I will definitely try to make a journal. You can probably buy Mod Podge at Hobby Lobby, right? I hope so. Anyway, I love the rustic look. I love the one you made me a lot!!!!!!..and I like the last picture you posted by the way, the girl on the right looks familiar.(the one on the left looks like my best friend too. How odd. ;-)~Abby <3<3<3
ReplyDeleteThank you! :) You can get Mod Podge at Hobby Lobby for sure! :)
DeleteAh, those two girls do look rather familiar. ;) I was debating posting that picture because I didn't want to give away that I made you one. :D That is what your giant, 1-year journal letter is in.(just so you know.) :) I couldn't keep it a secret any longer!
Oooohhhh! Can't wait. ~Abby
Delete